FreeplaneJrubyInstaller - making of
This wiki page is intended for experienced programmers and curious-minds, that want to know how the addon was made, how the addon works internally to enable ruby scripts, along with the problems-and-decisions adopted while creating the addon.
If you just want to run a ruby script, then instead read FreeplaneJrubyInstaller Addon
If you just want to try first-steps-of-programming with Ruby and make simple Freeplane ruby scripts, then instead read FreeplaneJrubyInstaller - developers
Contents
- 1 The making of the FreeplaneJrubyInstaller addon - a very long story for curious minds
The making of the FreeplaneJrubyInstaller addon - a very long story for curious minds
Reading this page is completely optional, the technical details are very resumed and a bit oriented for experienced programmers and curious-minds :)
All interesting information about how to *use* the addon is resumed in FreeplaneJrubyInstaller Addon
For me this addon is a personal give-back to the open freeplane community, in return for creating and maintaining freeplane - I enjoy using it a lot :)
I first started making this addon as an experiment, but later realized that the addon could also be usefull to others users in the freeplane community. So I took it as a long-time-geek-hobby, which slowly evolved at the rythm of my scarce free time.
With the addon I had in mind to accomplish:
- easy install of jruby-engine in freeplane (jruby is the added piece that makes freeplane understand Ruby scripts). Make this a no-fuss seamless-process to the normal freeplane user
- easy programming/creation of ruby scripts for freeplane, specially for newbie-programmers that want to try scripting in freeplane
- easy use/execution of ruby scripts in freeplane, for the casual-non-technical users that just want to use some freeplane-ruby-script.rb
While making the addon, there where a lot of decisions taken, and small details choosen by me. I want to explain them, in case they are usefull for other programmers to understand why things were made this way, and hope that someday someone improves the addon by implementing other better decisions. I did not knew where to start or how to explain all this, so I just started writting the "making of" the addon.
If you are a programmer or a curious mind who wants to follow the history of how it's made and works internally, keep reading. If not, just skip it, its ok :)
Great, you decided to keep reading - hope you enjoy. Tried to lay it out as clear as possible :) Grab a beer or a coffee/tea and bucle your seatbelt - its a long story and sometimes we'll move fast :)
I love freeplane. Since like 5 years now I use it everyday to organize my work and personal notes.
At first, the simple tree structure with some background colors was enough to be usefull, but with time I discovered that the multiple options of freeplane could fit my needs to better structure knowledge. No doubt a big part of freeplane-usefullness is how people use it.
So, someday I gave some attention to this scripts thing that freeplane had - basically you could write some code that would use the Freeplane API to programatically make freeplane do things. The code was in the Groovy language which is a kind of java-that-looks-a-bit-like-ruby, and I did not know groovy nor java, but ruby was (is) my prefered language and I feel very comfortable programming in ruby. So although with no knowledge of Groovy, I could slightly understand the groovy scripts, and managed to make a couple of simple scripts, basically from copy/pasting/modifying from examples of the scripts collection page and got my homemade very-simple-groovy-scripts going on. No big groovy knowledge there, I just did the basic modify-try-and-error cycle which many times is enough for simple things.
Time passed, and sometimes, very rarely, I would notice that my personal usage of freeplane, could be boostered with some little scripty-automation. This lead me to get bolder in making Groovy scripts, and soon enough I got to the point that I had to learn/understand a little more about Groovy to make my scripts more complex - the copy/paste/modify magic was falling short to what I wanted to program.
As it turns out, for another project, I passed the previous 6 months of scarse freetime learning C++ from a "renowned" book, and out of boredoom and curiosity I casually took a Java book to my one-week-vacations (instead of C++), and in one week of late-nigh-readings I ended up feeling more capable with Java than I felt with 6 months of C++ reading. And that was the tipping point to drop the study of C++ in favour of Java and use Jruby (Jruby = Java + Ruby) for that other project. The book that introduced java so well to me was Head First Java, and it made a very funny reading :) Take it to your vacations if you want to learn Java :)
So, luck took me to learning a bit of Java, and I knew that Groovy was java-that-looks-a-bit-like-ruby, so I started to improve my groovy scripts with the new java understanding. And it worked :) To a certain point. I managed to make the more complex scripts that I wanted with Java and Groovy. Still it costed me an enourmous efforth, as I could only do it in scarce free time, which meant sometimes severall weeks passed by between code-session of only a few hours, and that was my only practice of java and groovy. It was working, but carried along a steep beginner-overhead for me, far from efficient/productive, and only worth for high-priority-not-very-simple-but-not-too-complex scripts. Yes, a step forward, but not yet the promised land.
Jruby: Freeplane can also run ruby scripts with Jruby!
On the other hand, I did read in the wiki that it is possible to use other programming languages for scripting (scala, jython, etc) through the JSR 223. With some try-and-error I got jruby to work with freeplane (very simple after all!), and got all excited - using jruby I could write scripts for freeplane in the ruby language (instead of groovy/java). So, I started to think about making an addon to easily enable ruby scripts with freeplane. And that motivation slowly lead to the creation of the FreeplaneJrubyInstaller addon.
My first intention was for the addon to simply install Jruby in Freeplane to enable ruby scripts, and just that.
I had to learn how to make a freeplane addon (which after you read and try, you notice it's really easy!). Then I noticed that to make freeplane aware of jruby it was sufficient to put the file jruby-xxx.jar in 'freeplane-user-dir/lib/jruby-xxx.jar'. However the jruby-xxx.jar file is +20MBytes in size, which is too much to be packaged inside an addon.mm (that gave memory problems, both when building the addon myself, and later when installing the addon which would affect others who tried to install it - a no-go), and the alternative I came up was to make a java-downloader-window, that would be executed after the addon was installed in freeplane, and that would simply download the jruby-xxx.jar file from internet. That was not easy but got it done (the right way!) :) Also, I left the default download url pointing to jruby-9.0.4 (the jruby version I use and know it works!) but that can be easily changed in the future to upgrade to more recent versions of jruby (only if/when there is a convincing argument to upgrade! A prior jruby-9.0.something.jar did not work because of a jruby bug!). The ablity to change the download-url was done on purpose, as a simple method that allows future upgrades of jruby.jar
Just for future reference, to upgrade jruby.jar to a newer version, the procedure would be:
- close freeplane
- manually delete the existing jruby-xxx.jar file in 'freeplane-user-dir/lib/jruby-xxx.jar'
- start freeplane
- click the menu entry 'Tools -> Jruby... -> Check/Install Jruby version...'
- and automatically it will detected that there is no jruby-xxx.jar present, which will open the java-downloader-window, where you can manually write a new download-url pointing to the new jruby version that you want to install. (scrap download-urls from [1] )
- after the new jruby-xxx.jar is downloaded, restart freeplane, and you can then use the new jruby version
And so with the addon installed (and jruby post-downloaded), one could write a freeplane-ruby-script (ex: '<freeplane-user-dir>/scripts/my_ruby_script.rb') and then restart freeplane and click in the new menu entry Tools/Scripts/my_ruby_script to run it. In Preferences/Plugins some options had to be enabled, but that was also easy.
So, at this point the addon could install jruby in freeplane. With jruby installed, freeplane could already run ruby scripts.
Also, I've also noticed that it was possible for other future addons to use ruby instead of groovy addon-scripts inside the addon (via the addon.mm#scripts node, just like its now possible with .groovy scripts)
A good accomplishment, great!
Adding to ruby scripts the variables: c, node, ui, logger, textUtils, ...
However the ruby scripts did not had these handy variables defined - c, node, ui, logger, textUtils, ... - they had to be manually extracted from java classes... that's possible but it's annoying/awkward to do it in every single script. In groovy scripts these variables just work and that's great, so in ruby scripts the same would be desirable. That was possible to do using some ruby metaprogramming magic.
The code is in the file freeplane.rb (with descriptive comments!), you can find it in freeplane_user_dir/addons/freeplaneJrubyInstaller/FreeplaneJrubyCommonEnvironment/lib/freeplane.rb. This file is automatically required by freeplane_jruby_common_environment.rb, so in any freeplane-ruby-script its only necessary to require "freeplane_jruby_common_environment.rb" to have these variables availabe for use in *any* scope (like global variables).
 |
Resuming
 |
After, I realized that ruby scripts may at some point in the future, need to use rubygems. Rubygems by default uses a default system-wide directory to store all the gems, for all ruby programs (freeplane and non-freeplane). I did not wanted to use that systemwide-default-rubygems-folder, I wanted to use an isolated and self-contained rubygems-folder, where only the gems necessary for the freeplane-ruby-scripts could be stored and read from.
I've investigated about how to use only a local-rubygems-folder... First I started with bundler but it turned out to be an unexpected dead-end for this, and finally concluded that the best solution was to (avoid bundler and) define the environment variables GEM_HOME and GEM_PATH (no dependencies, clean-small code, easily understood) to indicate to rubygems that it should only load gems from a specific local gem-home folder. The result of using GEM_HOME and GEM_PATH is that the freeplane-ruby-scripts only see and only use the gems present in this local gem-home folder. Great, gems containment and isolation achieved :)
I've decided to place the local gem-home folder in freeplane_user_dir/addons/freeplaneJrubyInstaller/FreeplaneJrubyCommonEnvironment/gem_home. The code that makes this local gem-home ready to use in scripts, is in the file 'only_gem_home.rb' file, you can find it in 'freeplane_user_dir/addons/freeplaneJrubyInstaller/FreeplaneJrubyCommonEnvironment/lib/only_gem_home.rb'. This file is automatically required by freeplane_jruby_common_environment.rb, so in any freeplane-ruby-script its only necessary to require "freeplane_jruby_common_environment.rb" to only use gems from this local gem-home.
|
Resuming
|
NOTE: If you want to manage (list/install/uninstall/...) gems in local gem_home then have a look and edit the files freeplane_user_dir/addons/freeplaneJrubyInstaller/FreeplaneJrubyCommonEnvironment/gem.bat or gem.sh
NOTE2: If you are making an addon with ruby-scripts that needs more gems, then instead of adding gems into the common .../FreeplaneJrubyCommonEnvironment/gem_home which is shared by all freeplane-ruby-script, its better for you to package your own independent addon_gem_home folder, with a modified only_gem_home.rb pointing to the addon_gem_home folder. This is easier and garantees that your addon will be deployed and executed with exactly the same gems that you want (instead of relying on the common .../FreeplaneJrubyCommonEnvironment/gem_home which is intended to serve as a common base for the non-addon freeplane-ruby-scripts, and may even be tinkered by curious users out there :) ). However, (many) more gems could slow down yours scripts execution which may be annoying for users - have that tradeoff in mind.
So, at this point the addon was capable of installing Jruby, and then freeplane-ruby-scripts could be run from menu Tools/Scripts/my_ruby_script The freeplane-ruby-script should have a require "freeplane_jruby_common_environment.rb" that defines the variables c, node, ui, ... and also enables the gems (installed in gem_home) that thereafter can be required normally by the script.
Great :)
RubyLiveDebugger
Theory: Pry, Pry-remote, and why we open an external terminal (debug window)
Well, with all that ready, the next step would be to write some freeplane ruby scripts! And, as it happens to everyone who programs, at some point you'll find an error and debug your code for that error... When an error is found during execution of your ruby script, a short error-message-window will show up in freeplane (which tipically will not show the line number of the error). On the other hand the error will also be logged into the freeplane log file (freeplane_user_dir/logs/log.0), where you may find the line number of the error among other usefull info such as the ruby exception raised. So keep in mind that the log file will have more info about the error than what is shown in the small error-message-window that pops up.
And there you go reading the log file for the line number of your error, then opening the ruby script and rechecking that line and trying to mentally recompute and fing the error. And thats ok, but there is a better way availabe in ruby - there is this gem called Pry that is used normally to debug a program live while it is still executing (its a REPL launched inside a running program). Pry is very usefull, you just put a line of code in the middle of your program where you want, and then run your program and when the program execution gets to that line it waits for you to interact with it: read variables, change variables, call methods, etc, it's live coding inside your program in that point. Have a look a some youtube videos to understand it better, or wait 5 min to read this to the end and then it try yourself, its pretty easy to use, and we will use it with freeplane!
However Pry expects the program to be launched from a terminal and reuses the terminal's stdin/stdout to interact with the user, but we are running a ruby program with jruby which is called from java and the program stdin/stdout is who-knows-where... :) the stdout at least seems to be logged into the log files, but stdin is out-of-reach. For these cases (and other similar that happen in the ruby universe, like daemon processes), there is another gem called Pry-remote which uses tcp/ip to communicate between a pry-remote-server listening on 127.0.0.1:9876, to which its possible to connect with a pry-remote-client. The pry-remote-server is attached to the ruby program, and waits a connection from the pry-remote-client. The pry-remote-client is executed from another terminal, and will connect to the pry-remote-server via Tcp/Ip and use the client-terminal stdin/stdout to allow the user to interact with the ruby program (attached to pry-remote-server). So, using pry + pry-remote, we can debug a freeplane-ruby-script in the middle of its execution, from an external terminal that is running the pry-remote-client, and inspect the running freeplane-ruby-script to see its variables value and try new commands.
Using pry + pry-remote in this way implies severall things:
- 1) have the freeplane-ruby-script execute a pry-remote command (in the line where the debug will occur). This will start the pry-remote-server which will stay listening and waiting for a tcp connection in 127.0.0.1:9876
- 2) in a separate terminal window, launch the pry-remote-client (using java + jruby + the pry-remote gem)
- 3) finally once pry-remote-client is openned and connected, the user can debug the freeplane-ruby-script using that terminal (typing in keyboard, reading in screen). Tab is very usefull (autocompletion!)
As can be seen, manually launching up a pry-remote debug session is a bit daunting... and repeating it every time we want to debug something is not pleasant and a distraction...
So I automated it programatically so that a script-developer would not need to think about all this, but just use (write) a special command inside the freeplane-ruby-script where one wants to open a debug window: RubyLiveDebugger.open_debug_here(binding)
You can put the RubyLiveDebugger.open_debug_here(binding) in multiple lines - when the program is being executed, each time one of those lines is reached a debug window will open for you to debug the ruby script in that point of execution.
The RubyLiveDebugger class is defined in file ruby_live_debugger.rb located in freeplane_user_dir/addons/freeplaneJrubyInstaller/FreeplaneJrubyCommonEnvironment/lib/ruby_live_debugger.rb This file is automatically required by freeplane_jruby_common_environment.rb, so in any freeplane-ruby-script its only necessary to require "freeplane_jruby_common_environment.rb" to have available the RubyLiveDebugger.open_debug_here(binding) command
The RubyLiveDebugger is most usefull for freeplane-ruby-scripts developers - it's a kind-of development tool (a debug mode!), and so its not usefull/necessary to all other casual-non-technical-freeplane-users that just want to run/use an already-made ruby-script that they copied.
Debug-session commands (!!@ and friends)
Inside the pry-remote debug-session, you can execute normal ruby code and also use the pry-commands
The following pry-commands are more than enough to do basic debugging - you really only need the "!!@":
  * up/down keys   : to navigate in past commands (command history)
  * !!@            : to exit from debug-session
  * _ (underscore) : the result of last evaluated expression (usually the result from previous line)
  * ls MyObject    : list the methods of MyObject (see also "ls -h")
  * help           : to list all the other pry-commands
If you are really curious about other pry-commands, knock yourself out:
- this linux-journal article gives an overview of pry
- this demo video shows off pry in 8min (from its creator)
- the pry-wiki is where there is lots of more info... (lots)
To exit from a debug session, its mandatory to send the command !!@ - only exit with !!@ and never with 'exit' or 'quit' or closing the debug window directly. This is necesary for the pry-remote-server process to cleanup and properly release/continue the execution of the freeplane-ruby-script past the debug line. (the worst it can happen is to freeze freeplane indefinitely untill you restart it manually)
|
Resuming
 |
And now, at this point the addon was capable of installing Jruby, and then freeplane-ruby-scripts could be run from menu Tools/Scripts/my_ruby_script The freeplane-ruby-script should have a require "freeplane_jruby_common_environment.rb" that defines the variables c, node, ui, ... and also enables the gems (installed in gem_home) that thereafter can be required normally by the script. That require (together with certain adjusted Preferences) also enables the debug command RubyLiveDebugger.open_debug_here(binding) that can be put in any place of a script to open a debug window when that script is executed.
Awesome :)
RubyLiveDebugger: EDT-Thread (Gui freezed) vs Parallel-Thread (Gui responsive)
This next 2 parts will get a bit complex so better tell you now that these sections are completely optional - you can stick to debug using the 'RubyLiveDebugger: EDT-Thread (Gui freezed') with RubyLiveDebugger.open_debug_here(binding) as indicated in [2].
The explanation is a bit complex, and can be a turndown for first-starters, so I would leave the reading for a latter time. What we will do next is to open a debug-session in paralell with freeplane-unfreezed - that is, we can debug freeplane and see the results instantly refreshed in the freeplane-gui !!! If you want, skip the next explanation and simply read the resume in the end and test it yourself. Or watch the demo videos (end of the section) and go straight into wild-hacking without any theory (and sometime latter if you need to, come back to read the theory)
____
RubyLiveDebugger: EDT-Thread (Gui freezed)
As you will see when you start using the RubyLiveDebugger, while the debug-window is working, the freeplane gui (window) will be freezed and unresponsive. This is due to the fact that freeplane scripts (all of them: groovy or ruby) are executed inside the Java EDT-thread (the Java Swing EDT-Thread) which makes the freeplane-gui freeze since a script starts executing untill the script finishes executing, when freeplane-gui will unfreeze again.
Basically, imagine that freeplane works in this (imaginary) sequence:
- Freeplane is running normally
- The user clicks a menu-entry to launch a freeplane-script, and
- the freeplane-gui will freeze and start executing the script in EDT-Thread
- the script starts executing...
- ....the script continues executing...
- ...the script finishes executing
- the freeplane-gui will unfreeze (and visual changes will only now be updated in the gui)
- the freeplane-gui will freeze and start executing the script in EDT-Thread
Normally freeplane scripts execute so fast that we barely notice freeplane freezing. However when we put the RubyLiveDebugger.open_debug_here(binding) in a script, the script will open a debug session and will wait for the debug-session to terminate (!!@). The freeplane-gui will remain freezed, untill the debug session terminates (!!@) and untill the script finished completely, and only then freeplane-gui will unfreeze and update any visual changes.
Basically, imagine that freeplane with RubyLiveDebugger.open_debug_here(binding) in a script works in this (imaginary) sequence:
- Freeplane is running normally
- The user clicks a menu-entry to launch a freeplane-script, and
- the freeplane-gui will freeze and start executing the script in EDT-Thread
- the script starts executing...
- ... the script continues executing...
- ... RubyLiveDebugger.open_debug_here(binding) is executed and opens a debug-session with a debug-window
- ... user debugs in debug-window - (this stage takes minutes while all other stages take miliseconds)....
- ... in the end, user writes "!!@" which terminates the debug-session
- ... the script continues executing...
- ... the script finishes executing
- the freeplane-gui will unfreeze (and visual changes will only now be updated in the gui)
- the freeplane-gui will freeze and start executing the script in EDT-Thread
While inside a debug-session (debug-window) you can read and change direclty the freeplane-java-objects values (ex: puts(node.text); node.text="text changed" ) but because the freeplane-gui is freezed, you will not see any visual changes reflected in the freeplane-window immediately. When you finish the debug session with "!!@", then the script will continue executing, and when the script finishes completely, then the freeplane-gui will unfreeze and reflect all the visual changes at once.
Think of the EDT-Thread as a lonely CPU, that can only execute 1 line of code at a time. That EDT-Thread normally waits for mouse-input and keyboard-input, and refreshes the freeplane-gui. When we execute a script with a lot of code in that EDT-Thread, while the code of the script is being executed the CPU is busy and cannot do anything else, and so the freeplane-gui cannot be refreshed, nor the mouse-input processed nor the keyboard-input be attended. So while the code of the script is being executed in the EDT-Thread, the freeplane-gui is freezed. When finally the script code finishes executing, then the EDT-Thread will have oportunity to execute the freeplane-gui code and refresh the freeplane-gui with all visual changes, and attend mouse/keyboard-input, etc... You get the idea, right?
Ok, re-read this a couple of times if necessary to get a more or less clear picture of what is happening in the EDT-Thread - in the next paragragh we will give it a twist...
____
RubyLiveDebugger: Parallel-Thread (Gui responsive)
Now, imagine you have 2 distictive CPUs, where each CPU can run a distinctive thread: one CPU can run the EDT-Thread and another-CPU can run another-thread.
Now you can execute 2 threads of code at the same time, 1 thread in each CPU. So while CPU#1 runs the EDT-Thread code, the CPU#2 can run another-thread code - so EDT-Thread-code runs in parallel to the another-thread-code.
So, imagine that freeplane with RubyLiveDebugger.open_debug_here(binding) in a script works in this (imaginary) sequence, using 2 threads (2 CPUs). For simplicity, lets consider that
- [CPU#1] only executes the EDT-Thread (where freeplane-gui "lives") and certain parts of freeplane-script
- [CPU#2] only executes the another-thread, where RubyLiveDebugger.open_debug_here(binding) executes
And with [CPU#1] for EDT-Thread and [CPU#2] available for another-thread, imagine this:
- [CPU#1] Freeplane is running normally
- [CPU#1] The user clicks a menu-entry to launch a freeplane-script, and
- [CPU#1] the freeplane-gui will freeze and start executing the script in EDT-Thread
- [CPU#1] the script starts executing...
- [CPU#1] ... the script continues executing...
- [CPU#2]... the script executes Thread.new { RubyLiveDebugger.open_debug_here(binding) } and switches to another-thread [CPU#2] where it executes the debug-session with a debug-window (executing in [CPU#2])
- [CPU#1] ... the script continues executing...
- [CPU#1] ... the script finishes executing
- [CPU#1] the freeplane-gui will unfreeze (and visual changes will only now be updated in the gui)
- [CPU#1] the freeplane-gui will freeze and start executing the script in EDT-Thread
- [CPU#2]... user debugs in debug-window....
- [CPU#2]... in the end, user writes "!!@" which terminates the debug-session
With imaginary [CPU#1]/[CPU#2] we can execute 2 threads in parallel at the same time. So we take advantage of it by placing the execution of RubyLiveDebugger.open_debug_here(binding) in another-thread [CPU#2] so that [CPU#2] is now who has to execute-and-wait for the debug-session to terminate. Meanwhile [CPU#1] continues to execute the script in paralell untill the script finishes executing, and then gets back to unfreeze the freeplane-gui much faster (uncluttered from the debug-session!)
So, with 2 threads, we can make freeplane-gui unfreeze much faster. While the debug-session executes in paralell on another-thread This means you can have a debug-session open in a debug-window, and freeplane-gui unfreezed and executing normally as usual. At the same time! In paralell :) Using 2 threads!
There is a catch though: inside the debug session you can read freeplane-java-objects directly (ex: puts(node.text) ), but you cannot change (or 'write) freeplane-java-objects directly (ex: node.text="nooooo! ")
However there is a solution for it: from the paralell debug-session you can change freeplane-java-objects indirectly, with the use of invokeAndWait { ... }
invokeAndWait { node.text = "yes!!! use *invokeAndWait* when debugging in *paralell*!" }
If you dont use invokeAndWait{...} to make the changes, then sooner or later bizarre asynchronous error will creep up on you (with very non-indicative error messages), and freeplane behaviour will be inconsistent (ie, you will endup in a pit of suffering struggling with uninteligible asynchronous multithread errors disguised as other errors - yes, believe me, not even pleasant to show you, just take my word...)
You can see which methods of the Freeplane Scripting API are (r) read-only methods that you can call without invokeAndWait, and which methods are (w) write methods that must be put inside invokeAndWait - in Freeplane goto the menu Help / Api Generator: a mindmap opens with all the freeplane-scripting-api objects and methods:
- all the methods named getXXX(), and all the methods that have a (r) indication, are read-only methods that you can call without invokeAndWait
   # Example: nodeID is (r)
   [26] pry(main)> node.getNodeID()
   => "ID_529826392"
   [27] pry(main)> node.getNodeID
   => "ID_529826392"
   [28] pry(main)> node.nodeID
   => "ID_529826392"
- all the methods named setXXX(), and all the methods that have a (w) or (rw) indication, are write methods that must be put inside invokeAndWait
Its a bit awkward to explain this, but its very easy to identify if a method is read or write once you do it a couple of times.
____
I'll leave a resume of what is important to know about RubyLiveDebugger:
|
Resuming Requisites to use RubyLiveDebugger (in EDT-Thread (Gui freezed) or in Parallel-Thread (Gui responsive) )
|
As part of the addon, there are 2 menu entries in Tools -> Jruby... -> RubyLiveDebugger... to quick-launch a debug-session for you to play with freeplane at any time:
Tools -> Jruby... -> RubyLiveDebugger... -> Debug in EDT Thread (GUI freezed)
- launches a ruby script that simply calls
RubyLiveDebugger.open_debug_here(binding)
Tools -> Jruby... -> RubyLiveDebugger... -> Debug in paralell Thread (GUI responsive)
- launches a ruby script that simply calls
Thread.new { RubyLiveDebugger.open_debug_here(binding) }
In practice the Debug in EDT Thread (GUI freezed) RubyLiveDebugger.open_debug_here(binding) is good for creating a ruby script, as it suspends and debugs the script in a specific line
The RubyLiveDebugger: Parallel-Thread (Gui responsive) Thread.new { RubyLiveDebugger.open_debug_here(binding) } is not so good for debugging ruby scripts, but is good to interact with the freeplane-gui and test different situations quickly (like selecting different nodes with the mouse in freeplane-gui, and execute ruby commands in the parallel-debug-session - see the demo videos in the end of this section)
And now lets play a bit with the RubyLiveDebugger
Demo: RubyLiveDebugger: EDT-Thread (Gui freezed)
Demo: RubyLiveDebugger: Parallel-Thread (Gui responsive)
- https://youtu.be/dy6kDGApaKw
- Introduces the Scripting API mindmap (Help -> Api Generator), where all the freeplane Scripting API objects and methods are resumed (as well if they are (r), (w) or (rw) ). Use invokeAndWait {} to call (w) and (rw) methods.
RubyLiveDebugger - Long demo of simple operations on nodes, debug-session with freeplane responsive (1h16m long)
- https://youtu.be/J2_DMFagXsw
- Made for newbie-programmers, showing step-by-step examples of how to do simple operations with a node, attributes, text/plainText, on 1st-level children nodes, on all-descendents-nodes
- Tried to show a "programming cycle": you have an idea, search the freeplane-API-webpage (Proxy.Node) for available methods, try to code your idea using freeplane-API methods, test your code, fix errors, etc...
- The text notes used in the video are left below:
   # I'll try to show how to make simple things with the freeplane API
   # I will do this for the first time, consulting the API-web and certainly making mistakes. The idea is to show to newbie programmers how its done. To demo the "programming-cycle" :)
   # Always keep the freeplane API web open :)
   # Proxy.Node is the most used freeplane object :)
   #
   # http://www.freeplane.org/doc/api/org/freeplane/plugin/script/proxy/Proxy.Node.html
   # http://ruby-doc.org/core-2.3.1/Array.html
   #


   # node attributes
       # list all attributes names
       node.getAttributes.getNames.to_a

       # write attribute
       invokeAndWait { node.putAt("attribute1", "val_attr_1") }

       # read 1 attribute value (from the atribute name)
       attribute_name = "blue attribute"
       attribute_value = node.getAttributes.getAll(attribute_name)[0]

       # list all attributes by name
       rubyArray_with_names_of_attributes = node.getAttributes.getNames.to_a

   # node text
       # plain text (html format is removed)
       #read
       node.getPlainText
       #write
       invokeAndWait { node.setText("just plain text without any html code")}

       # text
       #read
       node.getText

       #write
       invokeAndWait {node.setText("new text")}

   # node's children (1st level only)
       # read text from them
       rubyArray_children_nodes = node.getChildren.to_a
       rubyArray_children_nodes.each {|child_node| puts child_node.text}

       # having the children in an array, we can operate in all of them more easily
       invokeAndWait {   rubyArray_children_nodes.each {|cn| cn.text = cn.text.downcase} }

   # node + all children (all levels + selected-node included)
       rubyArray_all_children_nodes = node.findAllDepthFirst.to_a
       rubyArray_all_children_nodes.each {|child_node| puts child_node.text}

   # only all children (without selected-node)
       rubyArray_all_child_nodes_without_current_node = node.findAllDepthFirst.to_a.delete_if {|a_node| a_node.nodeID == node.nodeID}

       #ex: lets add an new attribute to all children (not including selected-nodes)
       # the attribute will be the nodeID, for example
           # pseudo-code (or having an idea of what will will have to do in small steps)
           array_child_nodes_without_current_node = node.findAllDepthFirst.to_a.delete_if {|a_node| a_node.nodeID == node.nodeID}
           invokeAndWait do
               array_child_nodes_without_current_node.each do |n|
                   #...add atribute to n, with name "theNodeId" and with value "nodeID"...
                   n.putAt("theNodeId", n.getId)
               end
           end
Other notes about using the freeplane API with ruby:
Get array with all the (multiple) selected nodes
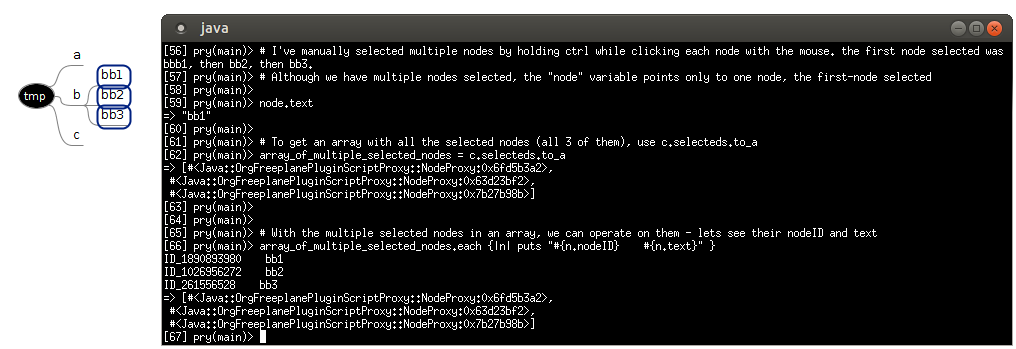
   # I've manually selected multiple nodes by holding ctrl while clicking each node with the mouse. the first node selected was bbb1, then bb2, then bb3.
   # Although we have multiple nodes selected, the "node" variable points only to one node, the first-node selected
   node.text
   => "bb1"

   # To get an array with all the selected nodes (all 3 of them), use c.selecteds.to_a
   array_of_multiple_selected_nodes = c.selecteds.to_a

   # With the multiple selected nodes in an array, we can operate on them - lets see their nodeID and text
   array_of_multiple_selected_nodes.each {|n| puts "#{n.nodeID}    #{n.text}" }
   =>  ID_1890893980    bb1
       ID_1026956272    bb2
       ID_261556528    bb3
Dir structure after addon installed
Well, having all those previous parts tested and working (jruby, script-variables c,node,ui,... , self-contained ruby-gems, RubyLiveDebugger ) I then focused on packaging the addon, so that after installing the addon it would be easy to use by ruby scripts and curious programmers.
When the addon is installed, it takes this directory structure in the freeplane-user-dir (other files and directories not relevant to the addon where omited from the diagram)
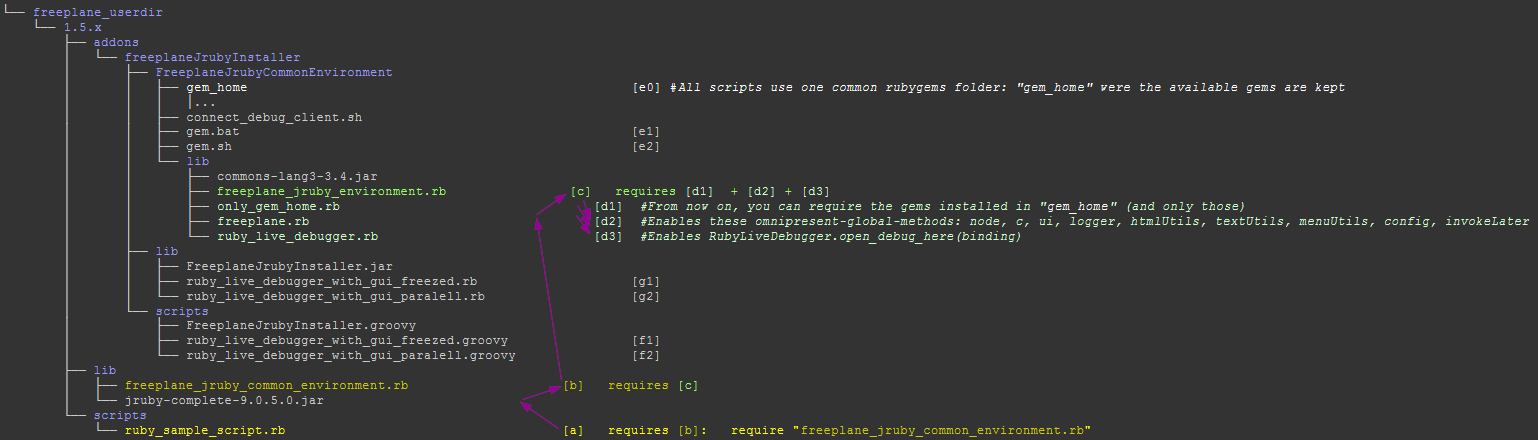
There are a couple of things represented in this diagram, and we'll go one by one, so just follow me
- The freeplane-ruby-scripts should be placed in the same typical location as groovy scripts - freeplane_user_dir/scripts/ - and they should start with
require "freeplane_jruby_common_environment.rb"- see the example script ruby_sample_script.rb . That require will call a chain of requires: [a] -> [b] -> [c] -> [d1]+[d2]+[d3] that together will enable to use the "gem_home", the omnipresent-global-methods c, node, ui, ..., and RubyLiveDebugger.open_debug_here(binding). So a freeplane-ruby-script only needs to start withrequire "freeplane_jruby_common_environment.rb"to get all the benefits from that chain of requirements.
- All freeplane-ruby-scripts share one common rubygems local folder: "gem_home" [e0]. If you want/need to install more gems, have a look and edit [e1] or [e2] as needed. However, take care to dont uninstall existing gems because they may be missed by other freeplane-ruby-scripts that need them. If you screw up, just uninstall/reinstall the FreeplaneJrubyInstaller and "gem_home" will be back to normal
- When packaging an addon, you use *addon-scripts* made with groovy. However, I've tested and checked that *if you already have Jruby installed in Freeplane*, then you can *also* make addon-scripts in ruby. So in the future you could install this FreeplaneJrubyInstaller-addon (to install jruby in freeplane) and after install another addon which uses addon-scripts in ruby. This can be usefull if you prefer to program addon-scripts in ruby instead of groovy (like I would :) ).
Now let me tell you about an acrobatic thing I did in the FreeplaneJrubyInstaller to make it first execute an addon-script in groovy (before jruby was installed) and later (after jruby was installed) make it execute an addon-script in ruby: I made the addon-scripts in groovy [f1],[f2] which will allways be executed first, and that contain code to check if jruby is installed, and, if jruby is not installed it executes another groovy script; if jruby is installed it executes another ruby script. The code for this [f1],[f2] was difficult, made in a hurry, in rude state, but works. The interesting parts (that might be usefull to be reused in other future addons) is the code that detects the presence of jruby, and the code that calls the execution of another groovy/javacript/ruby scripts.
Finally the addon is made
Hurray, so lets stop talking about it and start using it !!!!!
If you do not have the addon already installed, then install it now - see How to install the FreeplaneJrubyInstaller-Addon in Freeplane
Ok, if you got here, congratulations. I'm looking back at all I've written and start to doubt if anyone will ever read this far... Please write in the freeplane forum if you see this was actually usefull, cause I have serious doubts...
|
Resuming A freeplane-ruby-script should:
 require "freeplane_jruby_common_environment.rb"
 # The 'freeplane_jruby_environment.rb' file enables the following:
 # # [1] From now on, you can require the gems installed in "gem_home" (and only those)
 # # [2] Enables these omnipresent-global-methods: node, c, ui, logger, htmlUtils, textUtils, menuUtils, config, invokeAndWait
 # # [3] Enables RubyLiveDebugger.open_debug_here(binding)
And this sums up what you need to know to go ahead with freeplane-ruby-scripts. |