IDE setup
Contents
Pre-requisites
Freeplane can be developed in Eclipse, IntelliJ and Netbeans and directly imported from gradle files. Configuration and manifest files needed for debugging are created when gradle build is executed.
If you executed gradle builds for previous Freeplane versions, you should manually delete all MANIFEST.MF files which were generated by build scripts, they are not needed any more.
Eclipse
Eclipse can directly import gradle files using buildship plugin. Alternatively eclipse project files can be generated by gradle running command
gradle eclipse
Project freeplane_mac should be only included on Macs.
After direct import project freeplane_root should be removed.
There are eclipse launch configurations for debugging in project freeplane_debughelper. Configuration freeplane_debughelper/eclipse/freeplane.launch is the most useful one, configurations freeplane_debughelper/eclipse/freeplane dist.launch and freeplane_debughelper/eclipse/freeplane dist mac.launch are used to launch binary distributions created by gradle build.
IntelliJ
The short story:
IntelliJ can directly import gradle files. After the import the directory
freeplane_debughelper/idea/runConfigurations containing run
configuration files should be copied into directory .idea
created by IntelliJ in project root. Restart IntelliJ afterwards.
Detailed instructions:
Download and install IntelliJ [Community Edition]
- https://www.jetbrains.com/idea/download
- Extract in some directory
- Run .../idea-IC-VERSION/bin/idea.sh (or similar on non-GNU platforms)
- Do not import settings
- Choose (any) UI theme
- (optionally) Create desktop entry
- (optionally) Create launcher script
- Choose default plugins (you can disable some, like Android)
- Do not download featured plugins
- Click Start using IntelliJ IDEA
Import the Freeplane build system
- Click Import Project (when starting IntelliJ)
- Point to the settings.gradle in your checkout and click OK
- Choose settings like these:
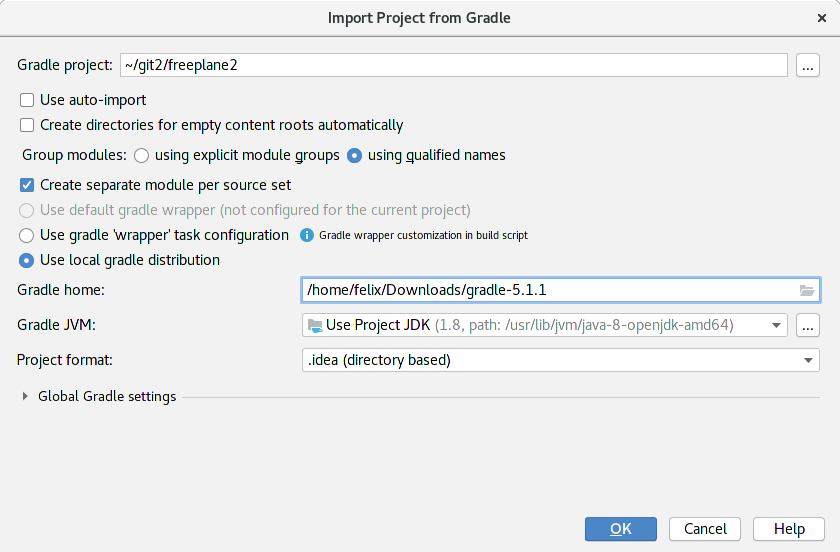
- Make sure to use an unzipped gradle binary distribution (~/Downloads/gradle-5.1.1 in this case); a gradle linux distribution package did not work for me, not even with this information
- Choose settings like these:
- Click OK and wait
- copy
freeplane_debughelper/idea/runConfigurations(the wholerunConfigurationsdirectory!) containing run configuration files into.ideacreated by IntelliJ in project root - Restart IntelliJ afterwards.

Start developing Freeplane
- In order to run, choose Run->Run...->freeplane
- In order to debug, choose Run->Debug...->freeplane
Netbeans
Netbeans can directly import gradle files using its Gradle support plug-in.
Gradle tasks needed for running and debugging from the IDE are defined in freeplane_debughelper/build.gradle