Difference between revisions of "IDE setup"
(re-write Eclipse build and startup procedure) |
(→Start developing Freeplane) |
||
| Line 61: | Line 61: | ||
=== Start developing Freeplane === | === Start developing Freeplane === | ||
* In order to run, choose ''Run->Run...->freeplane'' | * In order to run, choose ''Run->Run...->freeplane'' | ||
| + | ** If the field "Use classpath for module" is empty, put '''freeplane_root.freeplane_debughelper.main''' in there | ||
* In order to debug, choose ''Run->Debug...->freeplane'' | * In order to debug, choose ''Run->Debug...->freeplane'' | ||
| − | |||
==IDE: Netbeans== | ==IDE: Netbeans== | ||
Revision as of 09:01, 19 January 2019
Contents
Prerequisites
Freeplane's build system is based on GRADLE. So gradle can support concerning development processing and generation of configuration files.
Freeplane can be developed in basically any IDE (integrated development environment) like Eclipse, IntelliJ and Netbeans. These IDEs provide the UI (user interface) for the whole development process, including the support for code edit, search, debugging, testing,... At the same time, no developer is forced to use any of these IDEs, but can also use e.g. vim, as gradle is able to provides fitting configurations for any environment. If you use a proper IDE, configuration and manifest files are needed e.g. for debugging. They are created when executing gradle with the build parameter set.
If you executed gradle builds for previous Freeplane versions, you should manually delete all MANIFEST.MF files which were generated by build scripts, they are not needed any more.
IDE: Eclipse
Eclipse can directly import gradle files using the buildship plugin. Please see the appropriate documentation of that plugin within the internet.
Alternatively, if you want to configure Eclipse manually, all necessary eclipse project files can be generated by gradle using the eclipse parameter together with the gradle command. In effect, you should start a full and clean build using the following command:
gradle clean build cleanEclipse eclipse
This also creates an executable Freeplane application within the BIN folder below the current folder.
Now, you should start your Eclipse IDE and let it point to the base project folder (the folder where you just executed gradle). Up and running, you would now import the Freeplane project from the Eclipse top menu and choose ALL Freeplane project options from the import list. Now, please drop the freeplane_mac project when you don't work on a Mac. Otherwise it would cause you problems.
If you want to build and launch Freeplane for the first time in your newly configured IDE, you should look for the location of the launch configurations within Freeplane's source tree on the left side of the Eclipse window:
freeplane_debughelper / eclipse / freeplane.launch
would be the most useful one. But there are others like freeplane_debughelper/eclipse/freeplane dist.launch and freeplane_debughelper/eclipse/freeplane dist mac.launch, which are used to launch binary distributions created by gradle build.
As soon as you have once launched Freeplane as described, you will find appropriate menu items within the icons menu (RUN as well as DEBUG), from where you now can launch Freeplane for RUN or DEBUGGING purposes.
IDE: IntelliJ
The short story:
IntelliJ can directly import gradle files. After the import the directory
freeplane_debughelper/idea/runConfigurations containing run
configuration files should be copied into directory .idea
created by IntelliJ in project root. Restart IntelliJ afterwards.
Detailed instructions:
Download and install IntelliJ [Community Edition]
- https://www.jetbrains.com/idea/download
- Extract in some directory
- Run .../idea-IC-VERSION/bin/idea.sh (or similar on non-GNU platforms)
- Do not import settings
- Choose (any) UI theme
- (optionally) Create desktop entry
- (optionally) Create launcher script
- Choose default plugins (you can disable some, like Android)
- Do not download featured plugins
- Click Start using IntelliJ IDEA
Import the Freeplane build system
- Click Import Project (when starting IntelliJ)
- Point to the settings.gradle in your checkout and click OK
- Choose settings like these:
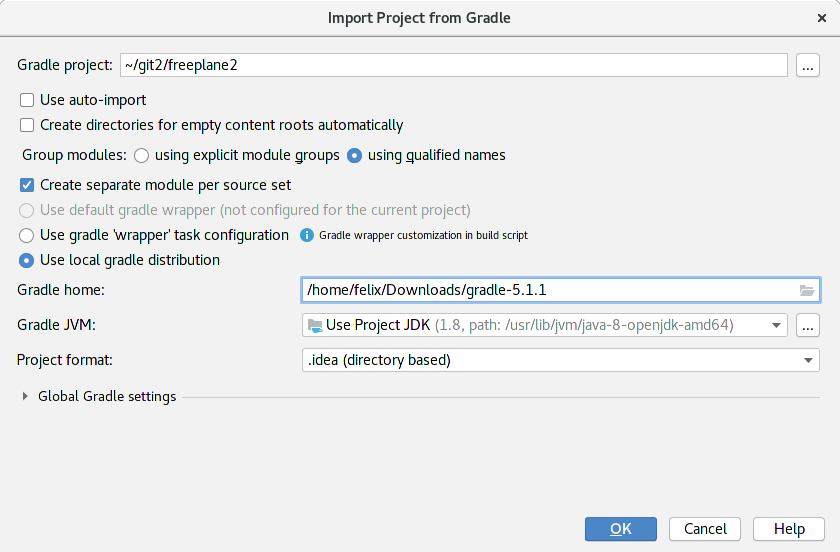
- Make sure to use an unzipped gradle binary distribution (~/Downloads/gradle-5.1.1 in this case); a gradle linux distribution package did not work for me, not even with this information
- Choose settings like these:
- Click OK and wait
- copy
freeplane_debughelper/idea/runConfigurations(the wholerunConfigurationsdirectory!) containing run configuration files into.ideacreated by IntelliJ in project root - Restart IntelliJ afterwards.

Start developing Freeplane
- In order to run, choose Run->Run...->freeplane
- If the field "Use classpath for module" is empty, put freeplane_root.freeplane_debughelper.main in there
- In order to debug, choose Run->Debug...->freeplane
IDE: Netbeans
Netbeans can directly import gradle files using its Gradle support plug-in.
Gradle tasks needed for running and debugging from the IDE are defined in freeplane_debughelper/build.gradle